 Hyperfocal Design
For my HDR Time-Lapse Sky Dome project, I originally stuck to shooting afternoons, sunsets and dusk time-lapses as I only had the battery that came with the D800. It only lasts a max of around 4 hours. Creating day-length time-lapses required the creation of a custom battery setup – I’ll outline how it was done in case you’d like to try something similar with your own camera.
Remember, we aren’t licensed electricians or anything, so any modifications you make to your camera/battery are 100% at your own risk!
Requirements and options
My requirements are that the battery must last at least 15 hours to capture half an hour or so before sunrise, all the way through to half an hour after sunset. I figured that my options were the following, which you might want to consider depending on your needs:
- Buy a bunch of Nikon EN-EL15 batteries and swap them out as you need to. Pros: Easy and simple. Cons: not cheap, requires touching the camera about 4-5 times a day, with no precise way of knowing when a change is needed. More room for error, imprecise timing. Requires charging of 4-5 batteries. Etc!
- Buy a battery pack like the MB-D12. Not an option for day length, but you’d get half of a day, maybe 8 hours.
- Hook up the Ep-5b (dummy battery/power supply connector) to an AC adapter and plug it in to the wall somewhere, or into a suitable battery. Good if you have access to a magical rooftop or if your subject matter just happens to be out your window. You’ll generally pay about double for everything to use AC power instead of DC.
- Use a deep cycle battery, like those used in boating or RVs, and hook up the EP-5B to it using a DC to DC converter. Requires some electronics know-how, soldering, bare wires, etc
I opted for number 4, as my dad knows his way around a soldering iron and electronics in general. Hyperfocal Design is now a family business(!) With a few hiccups along the way he managed to get the D800 running off a 12V, 12aH lead-acid battery, with a car cigarette charger and DC converter in between to reduce the voltage from 12V to 7.7V.
What voltage exactly?
We were a little concerned about the voltage that the camera could handle, as warranty doesn’t cover power surges. The Nikon battery itself says 7.0V, while the converter was supposed to bring a 12V current from the lead-acid battery down to 7.5V. Apparently going over by 10% isn’t a huge deal, so we were planning on settling for 7.5, however the converter actually outputted 7.7V, which was right on the borderline.
After rigging up a number of resistor setups to try and bring it down, we realised that a) there aren’t many resistors out there that are small enough and b) even after successfully reducing the voltage to 7.3, the camera failed to operate, and gave us “err” warnings on the camera’s LED display. This was quite strange as this is over the voltage the battery lists… so following this discovery we tested a 3/4 charged Nikon battery which read 7.1V. How that battery worked at 7.1 and ours failed at 7.3 I’m not sure!
This prompted us to try and test the Nikon battery again at full charge, which measured a surprising 8.2V! So we figured that 7.7V would be perfectly fine and left it as it was, and it works with no problems. Still don’t know why the Nikon battery reads 7V, unless its an average of its max and minimum voltages.
Deep cycle, lead-acid battery
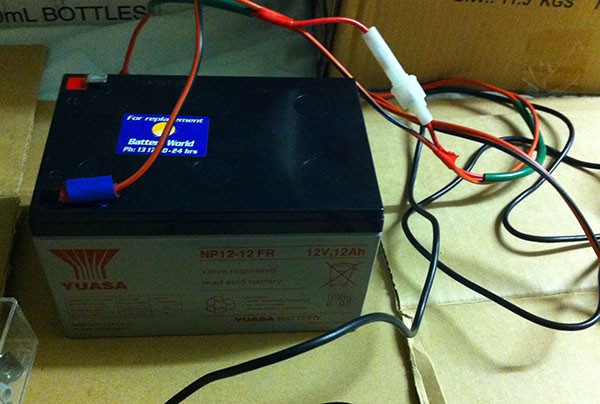
In a nutshell, the battery is a deep cycle, lead acid battery, usually used in boats or RVs where a constant low current is drawn. This is perfect for long term camera usage, but it outputs 12V, so its hooked up to a DC to DC converter and transformed into 7.7V. As the D800 battery lasted 4 hours at 1.8 amp hours, this 12 amp hour, 12V battery should last at least 10x that! I got this one because I may end up doing not only a full day length sky, but up to a 24hr timelapse that covers night to day to night. That may require a 2 camera set up, or some speed changing of ND filters + fancy colour calibrating. That will all come later!
DC converters & plugs
We saw a few solutions specifically for converting 12v to 7.5v on Amazon and Ebay, however none of them shipped to Australia, and they seemed to be very cheaply built. So we opted for the below converter which is designed to fit in your cars cigarette charger, and can be set to a variety of voltages:
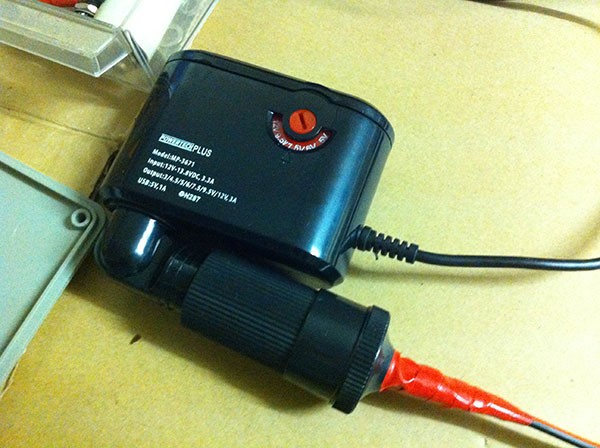
We grabbed a female charger to snap this into, set the voltage to 7.5 and placed a fuse between it and the battery.
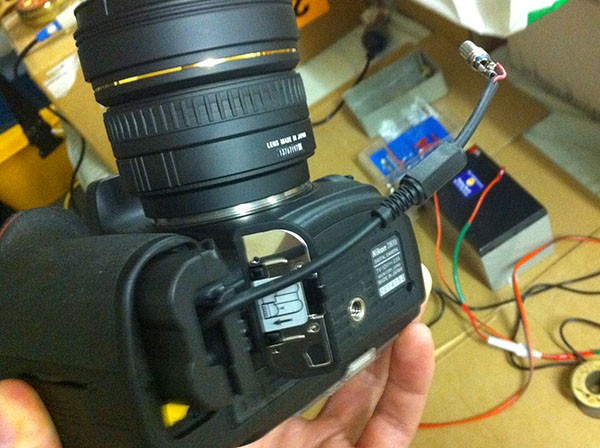
Dummy battery
The EP-5B, or “dummy battery” takes power usually from the wall via Nikon’s AC adapter, however we snipped off the end piece and attached a plug to go into the DC converter:
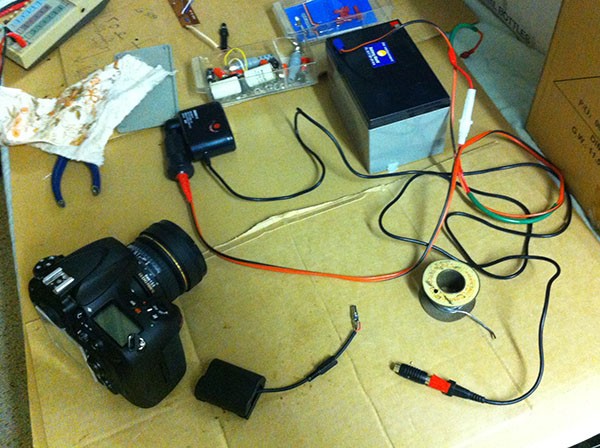
Here’s all the pieces:
If you’d like to see what sort of time-lapse footage this enabled, check out this day length time-lapse:
And here is a render in Blender Octane edition, using the HDRI time-lapse sky as a background and for lighting:
Thanks
Special thanks to my dad, who helped me put this lot together! I’ll give him the link to this web page in case anyone wants to ask him any technical questions, and you can ask in the comments below.
Also thanks to these guys, who gave us the confidence to turn the camera on without it blowing up:
How to make long-term time lapse, by “Fpound”
Aaron Priest’s Lawn Mowing Time-Lapse
If you’d like to receive future updates on the time-lapse HDRI skies, you can click here to sign up to our newsletter.


Very informative article. Appreciate if you can give any advise on connecting Nikon EP-5B dummy battery to external power banks like Anker Astro Pro2 20000mAh
As the usual disclaimer, I’m 100% not an electrician so please do you own research, having said that:
Not sure, you’d need to reduce this battery’s minimum 12v down to 7.5V and then I guess its all much the same, you’d just need to do some wiring to get the EP-5B to the voltage converter’s wires. Use a fuse and remember if you blow your camera up doing this, the warranty is void!