Hyperfocal Design
I do like to talk up how great our HDRI skies are for 1-step image based lighting and how you don’t need additional lights and so on, however every project is different and sometimes you might like to tweak a few things! Over the years I’ve had a number of emails and requests, suggestions, etc for what you can do with our HDRIs and now the time-lapses.
Here’s a breakdown of some tweaks, improvements or adjustments you can make:
Lengthening time-lapses
In case you missed this, you can lengthen some time-lapses by following this After Effects tutorial.
For Nuke, check out the KRONOS plugin with optical flow motion.
Merging time-lapses
See the above AE video on how to do a simple blend between two different time-lapse skies.
Nuke users will want to use an “Append Clip” node.
Reversing time-lapse footage
Often it can be pretty hard to notice you’re looking at a rewound piece of sky footage, depending on the cloud type. This way you can make an afternoon to night into a night to morning sequence. The Afternoon2Night01 sequence works particularly well for this.
In After Effects, simply right click your layer, go to Time > Time Reverse Layer. In your 3D software, look for values like Offset and Start/Finish frames to quickly reverse time.
In Nuke, add a re-time node and check reverse.
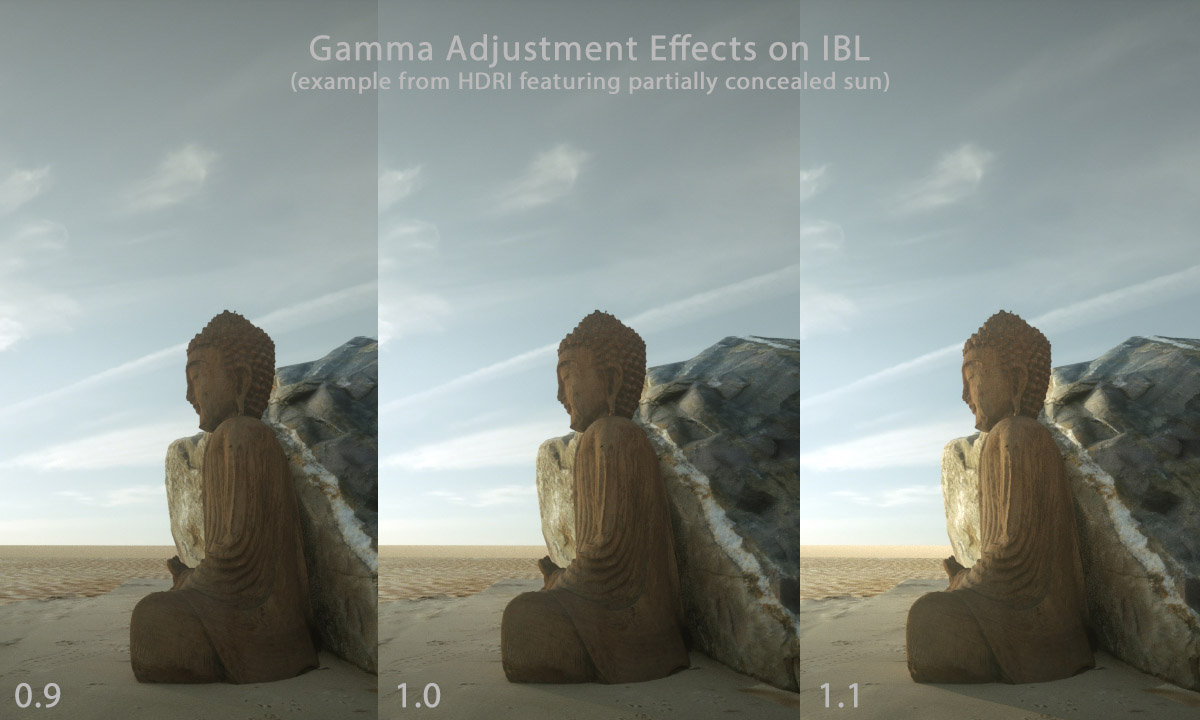
Gamma
This is one of those things I often talk about in regards to MDRs or incorrectly shot HDRIs that have been clamped. To fix those HDRs often you need to crank the gamma, introducing a host of other problems. When starting from a HDR with full dynamic range however, tweaking the gamma up or down a little can help you get your lighting contrast levels and shadows just the way you like them. Below is an example from a sky where the sun is partially obscured by cloud, so if we want more contrast and sharper shadows, we only need to make a small adjustment:
The horizon line
Sometimes, depending on your scene and geometry setup, you may find that the half way point in the skies (the black lower half) appears on the horizon line. To fix this there are a few easy ways including:
- Drag up your ground/ocean plane near the horizon
- Slightly adjust your U/V co-ordinates or tiling values to bring the horizon down
- Increase your cameras view distance and your ground plane size
In the latest time-lapse I’m working on, I’ve mirrored the sky at the horizon and blurred it 50px below the horizon to make things even easier.
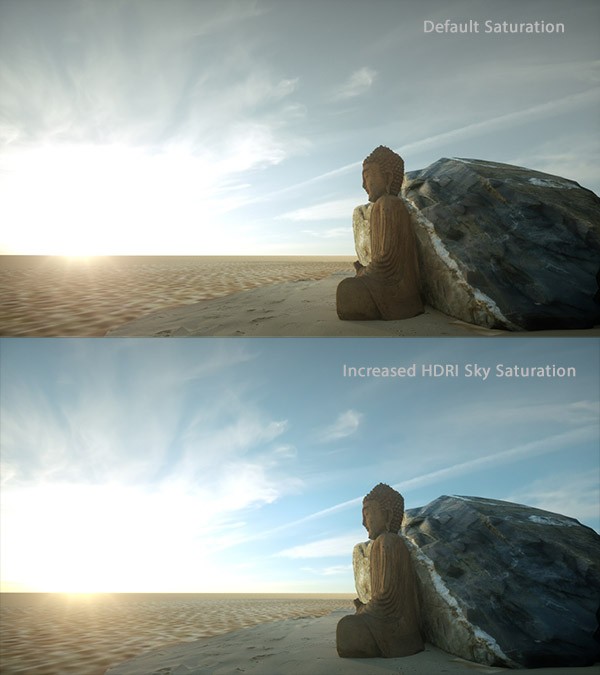
Color, white balance and saturation
I like to provide our skies slightly on the de-saturated side to give you the most flexibility in your own workflow. HDRIs of course feature so much color depth that they hold up very well to adjustments in color, white balance and saturation. Remember when doing a simple boost in saturation, typically you will get more blue fill from the sky and more orange light from the sun. Simple white/color balance tweaks can give you a surprising number of different looks as well, and can help match any existing footage you’re using.
Exposure
For the time-lapses I’ve let the brightness fall off slightly from day time or sunset to night to keep things as easy as possible. If using an afternoon or sunset to dusk/night, you’ll often just want to add a slight brightness increase over time to keep your exposure level roughly the same during the whole time-lapse, unless of course you’d like it to simply get darker.
Tonemapping
If you want a really dramatic, alien or surreal sky, definitely check out some tone-mapping operations you can perform on the skies. You might have noticed how popular HDR photography is, and how garish some results can be, but when done right you can get some nice effects. Here’s a post of mine on SkilledUp that goes into tone-mapping a bit more. Photomatix offers one of the best tonemappers out there, but Photoshop also works fine, as will After Effects or Nuke with plugins. Of course tone-mapping creates an 8bit image that’s unusable for IBL, so use one HDRI sky for IBL and the tonemapped sky for your background.
Also consider outputting your renders to EXR and tone-mapping the result to gain that extra level of control over how bright/dark your sky is compared to the rest of your scene. This can also be achieved by using different sky domes for lighting and your background.
Lens Flares and bloom
Perhaps so obvious its not even worth mentioning, they’ve been a staple of CGI since day 1! Lens flares and or HDR Bloom effects can really help integrate your sky into your scene. Can be done both in post or within your 3D application.
Careful now!
Whenever you’re editing .EXR HDR images or footage, make sure you are working in full 32 bit float, otherwise you risk saving out in 8 bit – useless for lighting. Also keep an eye on your levels – if you accidentally get your sun’s RGB over 65k you’ll suffer the consequences in your 3D software with some broken lighting. I particularly like using Nuke to keep an eye on these numbers and because its built for 32bit linear editing. It will give you great clues as to problems, for example displaying clipped RGB numbers as “inf” or minus/less than zero.
I seem to swap between AE and Nuke depending on what I need to do, and what I find easier to visualize in one program vs the other (I’m still quite the noob in both, really!). I have noticed however that quite a large number of AE effects only work with 8 or 16bit images so again be careful you don’t lose your 32 bit depth.
Any ideas?
If you have any other hints or tips please feel free to share below!
Want to try?
If you’ve yet to try our HDRI time-lapse skies, you can download them here (sign up or social share required).