Hyperfocal Design
First: LDRI
To easily explain what HDRI is, we can compare it to an every day LDRI (low dynamic range image). LDR images are what we use commonly for photographs, the web, in print, 3d graphics, and on TV. As their name describes, they have a low dynamic range, which means they have a limited ability to display a wide range of luminosity or brightness values. Lets take the page you are reading right now – the black letters are the darkest point at zero brightness while the white background is as bright as your monitor can display at say, 100. This range of displayable brightness is very low, hence the term LDRI.
HDRI
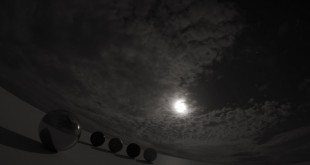
Now to compare this with HDRI. The best example is an outdoor scene with a mid day sun and dark shadows – the brightness of the sun when compared to our example of the monitor would be several hundred thousand times as bright. So you have shadows at a brightness value of zero and the sun at, say 300,000. When viewing this scene with the naked eye you have a HDRI, if you view a photograph of this same scene displayed on your monitor or as a print, it is an LDRI.
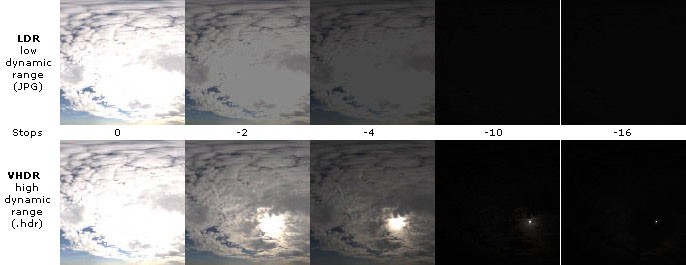
Using special software you can construct a HDR image from a series of LDR images. By taking photographs that capture everything from the darkest shadows to the brightest highlights and merging them together, a HDR image is created within a special file format. The most common two file formats currently are .hdr and .exr. This file format can be displayed on a LDR display (your monitor) at any brightness level you desire. All of the brightness data is there within the file to use as you wish, but only a limited range of brightness within that image is displayable at any one time due to your limited LDR monitor display.

(image by Erik Reinhard & Jack Tumbling)
Photography and Tonemapping
HDRIs are useful for photographers in some situations where they want to show details in shadows yet still capture all of the detail and colour in a bright sky. To display both the exposed shadows and the detail in the sky at the same time, a process called tonemapping (or compression) is used. This takes the merged HDR image and essentially squashes it all into one LDR image so that most of the HDR brightness values are displayed at the same time. Tonemapped images are useful artistically, and can also be used to more accurately simulate what the human eye can see in reality. A common use for this is in architectural/real estate panoramas taken indoors where you can clearly see the interior, but the windows are completely blown out/overly bright. If the photographer takes a series of LDR photographs, creates a HDR, and then tonemaps the result, we are left with an image that shows the interior and the garden outside. This technique is useful for virtual tour panoramas, crime scenes and other technical/scientific applications.
HDRI in Computer Graphics
In regard to computer graphics, HDRIs are used in a variety of different ways by software that supports this special file format. Using a HDRI as an environment map (a background image that wraps around the entire scene), the software uses the data within the HDR to light the scene, display a background image (that can display any chosen exposure level) and to create realistic reflections.

When the software uses a HDR image to light a scene, essentially what happens is that the program looks at the various intensities and colours of light from each pixel in the HDRI and projects that down on to the 3d scene. So for a cloudy blue sky the software will “detect” the sun, find that it is extremely bright, and project a relevant light intensity from that part of the image down onto the 3d scene. The blue sky and clouds will cast blue and white light onto the image, but because they are no where near as bright as the sun, the intensity of light will be much lower. The resulting lighting of the scene is very realistic and rendering is somewhat faster than other comparable lighting solutions.

When being used as a background image/environment, your 3d software can display any range of brightness from the HDR image. So for example if the virtual camera is indoors and a dark interior needs to be exposed, the background image outside the windows will in turn become very over exposed. If the same camera moves outside, the software can alter the HDR to properly expose the sky, bringing out all of the detail. Of course looking back inside the house it will be totally dark. Coming back to tonemapping again, if you wanted both the interior and sky to be properly exposed at the same time, the resulting image would have to be tonemapped. When rendering 3d images, HDR really stands out in terms of accurate and realistic rendering of reflections. Using a standard LDR environment, reflections look duller and they are not as accurate. Objects with lower reflectivity are the most noticeable. If you have an unreflective object trying to reflect a LDR image of the sun which has only a brightness level of “100”, you aren’t going to see the reflection. Whilst if you are using a HDRI of the sun where the sun’s brightness is 300,000, even the unreflective object will get a nice accurate reflection of the sun appearing.
Shadows
HDR lighting of CG scenes unfortunately often results in fuzzy looking shadows, especially when sufficient dynamic range has not been captured. The higher resolution the HDR, and the higher the dynamic range or sun brightness, the sharper the shadow. Depending on the end goal, artists use a combination of traditional lighting setups and HDR lighting, or just HDR lighting to achieve realistic shadow results. Other effects resulting from the use of or in conjuction with HDRI include: – More accurate blurring or motion blurring of specular highlights and reflections – Extreme flexibility in changing levels/curves within photographs with little or no resultant banding or grain problems – Bloom: For extra bright highlights, artists and especially game developers can place fancy looking glow effects around the bright highlights or a glow that “bleeds” over onto surrounding objects. – Ability to dynamically change virtual camera shutter speed/exposures to perfectly match scene lighting or mood
HDRI and Realism VS Photorealism
HDRI can be used to simulate either the human visual system or a camera. Much of the time 3d artists attempt to simulate a camera rather than reality, adding effects such as glows/bloom, over or underexposing the final image or giving it a colour cast. These effects add drama and style, or “eye candy” and can, in a way look better or more expressive than reality itself. Hence the term “photo” realistic. Among other things, HDR helps simulate photorealism by adjusting exposure levels in the same way that a camera does. For simulating reality itself as seen through a human’s eyes, tonemapping on a LDR monitor or displaying on a HDRI monitor (currently in their infancy) can simulate this goal.

Image Courtesy ArchAngel Visual
Conclusion
So to recap – when someone says “here is a HDR render”, or “I used HDR” usually what they are saying is that they used a HDRI environment to light their scene, for reflections and for the background image. Or when talking about photography they probably mean they took a series of photographs at different exposure settings, and tonemapped the HDR to bring out details in the darkest and brightest areas of the image.
Hyperfocal Design
Hyperfocal is a developer of HDRI Sky and Environment maps since 2002, run by director/photographer Jay Weston.