 Hyperfocal Design
What are clamped or un-clamped HDRIs?
I’ve been writing about this a lot lately as I think HDRIs in general are often used only for ambient lighting, when in fact if shot correctly, they can be used in a much simpler (and more realistic), 1-step lighting workflow. Originally I made a post on CGArchitect called the Effects of MDR vs HDR on image based lighting, and then recently I did a video where I tried to further refine my thoughts and communicate the concept in the simplest manner possible:
Here’s a bit of a transcript (cleaned up and clarified a bit too) if you’d prefer to read:
Transcript
“Hi guys, this is Jay Weston from Hyperfocal Design, today I wanted to talk about HDRIs some more and how they’re different from what I’ve been calling “medium dynamic range images”. A more technical term is probably “clamped HDRIs”. If you’ve got a HDRI that’s medium dynamic range or its been clamped, essentially it just means it hasn’t been shot correctly and dynamic range is lost or “clamped”. When you lose dynamic range in a HDRI, you lose brightness, contrast and shadows. The goal of photographing a HDRI is to capture the entire range of brightness in a scene, from dark shadows to bright sun. If we’re shooting the sun, the entire brightness of that sun should be captured down to a clearly visible disc, complete with color information.
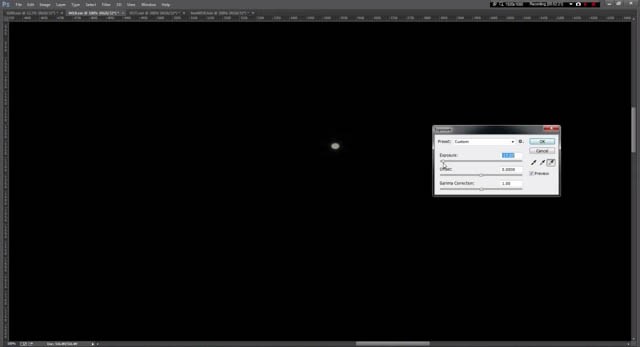
However if you look at this clamped one for example, (its just a free one I’ve downloaded off the internet) it starts to clamp out (lose brightness) at around the 4 stop mark. So a bright, fully exposed sun like this should be around 16 stops, but if we come down to -16 here in Photoshop its just black, and what that means is that in simple terms, if you’ve got a sky dome (the whole hemisphere) with a tiny little sun in it, and that’s only putting out 4 stops of light in a tiny little area, and then the entire sky dome around it (1 stop of range) is blue, then its outputting very little sun light and you can get tons of blue light from the sky in your scene.
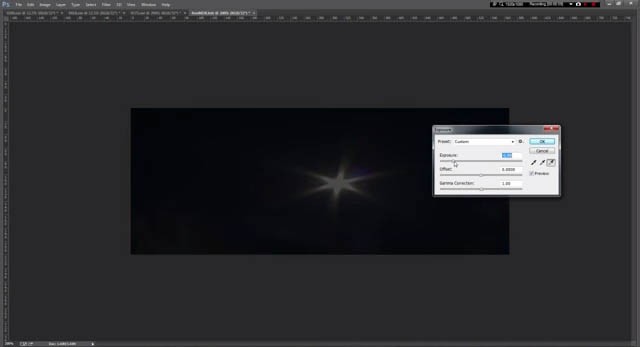
I’ll compare it to one I’ve shot. Here’s a few frames from the time-lapse HDRI sky dome’s I’ve been shooting. This one is comparable time of day to the one we’ve just looked at. If we adjust exposure in Photoshop and come right down to -16EV we can see the disc of the sun itself. So it hasn’t been clamped at all. A big drawback with a clamped sun, apart from not giving you much lighting information, is that its also going to clamp out at a white value, so you never actually get any color info from the sun, whereas this un-clamped sun will be slightly yellow. As you go closer to sunset it will give you more yellow/orange lighting and the range will drop off a little more, giving you more of that yellow/blue lighting scheme when the fill light from the sky contributes more and the sun, less.
So again that’s 16 stops for a fully revealed sun that’s not behind cloud, and then this is a frame taken just around sunset, and if you look at the sun there, it starts to dim at around 5-6 stops. So you should look at that as a bench mark for what you’re looking at in terms of EV or stops between mid day and sunset. You may have less range or more range depending on how hazy it is or if there’s any light cloud cover, and then after sunset you only have kind of 1 or 2 stops of dynamic range as of course there’s no sun. You’ll also notice that when viewing un-clamped HDRIs with the sun concealed by cloud, you can lose any number of stops depending on how dense the cloud cover is. This will provide you with a lot of difference in terms of lighting contrast between light and shade, along with different levels of shadow sharpness.
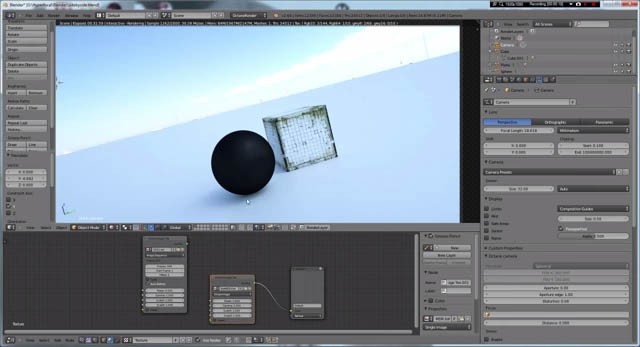
Ok so here (in Blender Octane) we have the clamped MDR sky dome that we were just looking at in Photoshop, and this is lighting the entire scene, there’s no additional lights or ambient lighting/ambient occlusion. As you can see, because of that very weak sunlight in the MDR, the blue sky is contributing way too much to the overall scene lighting, giving us a blue color cast along with the very low contrast and blurry shadows that makes this scene look like its twilight or overcast, when its actually shot in the middle of the day. You can also see in the highlights on this rough, dark material, the sun hasn’t got enough strength to show up in that rough highlight, which can affect a whole range of different materials, from reflective to diffuse and anything between.
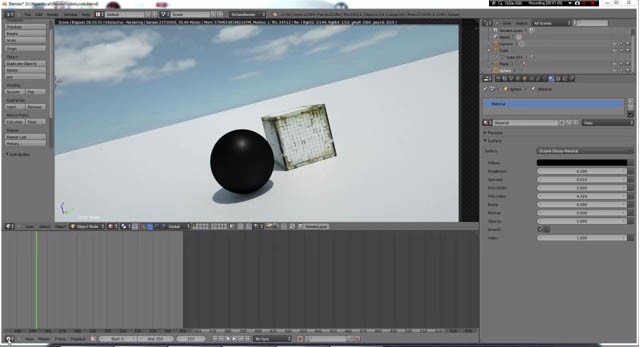
So if we compare this to my own un-clamped HDRI, shot with a ND filter and the correct number of brackets during a similar time of day to the MDR, this un-clamped sun causes a bright highlight in this rough reflective material, whereas not at all in the MDR – the sun lacks the strength. We have crisp shadows with contrast, there’s no color casting because the sky isn’t contributing enough blue light compared to the very bright, un-clamped sun. The other big problem with clamped suns in these medium dynamic range images is they don’t have any color information in them. When they’re clamped, they clamp out at a grey scale value, for instance, 511, 511, 511. So there’s no subtle light coloring coming from the sun.
Generally what people do with these medium dynamic range images to fix them up is (this is a popular one) you just crank the gamma value until you get a sharper shadow, of course it makes the color cast even worse, its very saturated looking and the shadow isn’t even really that sharp. So you’re going to have to insert a desaturate node or adjust it in Photoshop, and it becomes a multi step process, and the sun is still clamped to that grey scale value. It is awkward, and will take you a lot of time compared to a 1-step lighting solution, which I think… HDRs, that’s what they’re all about, dropping in a sky dome and it just works first time. The other way people try and fix these is by painting in a sun themselves, and that’s not a terrible solution, but again you’re going to have to spend that time going in and setting the right amount of light stops in the sun you’ve painted in, make sure the color is correct, that you don’t over or under saturate the sun, and the blend between the sky background and sun won’t be as nice as a photographed one either. So its just generally less accurate. And finally the last way to fix these is to add your own virtual sun in, so you probably halve the power of the clamped MDR and get a virtual sun in, and that’s an ok solution, and gives you some more control over the virtual light. Its something you can also do with a proper un-clamped HDRI if you want an extra level of control, but again its a matter of time whether you want to go through that process of adding your own light in, choosing the correct strength, color and everything else to go with it.
So as I said in the Photoshop part of the video, just make sure when you’re looking at HDRIs for something that has a fully revealed sun, you wanna be looking at something like 14-16 EV if there’s no cloud concealing it. Then as you come down to afternoon, near sunset, you’re looking at 5-6 stops right on the horizon line. Then as the sun dips below the horizon, its more like 1-2 stops of light. You can see as we go closer and closer to sunset here in Blender, the sun loses a bit of strength which means we get more blue fill light, the sun is more saturated, so we get more colour both from the sun and fill light. That’s another thing you can do with these time-lapses, you just choose the frame, and whether you want sunset or mid day or somewhere in between. You can look for frames that either have fully visible suns with sharp shadows or you can find something where the sun is only just behind a bit of light cloud, which will diffuse your shadows and reduce contrast. Or you can have something where its even further behind cloud, which gives you a naturally blurry shadow (lower dynamic range). So that’s a way of coming up with different lighting scenarios quickly.

I hope you found that useful. There’s a set of free samples much like this one available on Hyperfocal Design’s website, thanks for watching.”
Get the sample time-lapse HDRI sky domes here.

Thrilled with your hdr’s Jay, work wonderfully. Although I’m curious as to what software you use to compile them? I’ve been toying with photomatix but don’t really get a great result. Do you use something different?
Regards
R
Hi Ryan,
Thanks! I used Nuke with a lot of help. I also tried photomatix and I think there’s a chance you could still use it, but you might have to convert gamma 2.2 (I think its 2.2, but I don’t think it gives you that information) to gamma 1.0. Try bringing a photomatix image into photoshop for example and tweak the gamma, you might find that works out ok, but probably not as accurately as Nuke.
Regards,
Jay