 Hyperfocal Design
So I’m a ways overdue now aren’t I? I put Q4 as the release date and now that’s long gone. So what’s going on with the time-lapses? Good question!
Initially I was testing the best shooting setup to capture the HDRIs as efficiently and accurately as possible, and since that time I’ve been focused on putting them together in the most accurate way possible. I need to perfect the camera curves, colors, contrast and gamma, and the short answer is, creating these super accurate HDRIs is difficult without a linear toolset.
Current Workflow
My workflow right now consists of a rather large amount of programs, including:
- Lightroom – import and export RAW NEFs to aRGB or sRGB Tiffs
- Photomatix – import non-linear Tiffs which-are-close-to-linear-but-not-quite(who knows)… and make HDRI frames
- PTGUI – convert to lat/long format
- Adjust with Photoshop…
- Test render with Blender Octane and Maxwell Render – reveals a somewhat high contrast result…
When comparing my IBL renders to my go to reference HDRIs (Paul Debevec’s Sky Probes), my results at a similar time of day is much higher contrast, leading me to believe that at some point in my workflow, something is going wrong in terms of gamma curves, camera curves or a combination. My initial sunset HDRIs were most likely not affected as much because they had less range (the sun was obscured by cloud).
High Contrast Frame Comparison
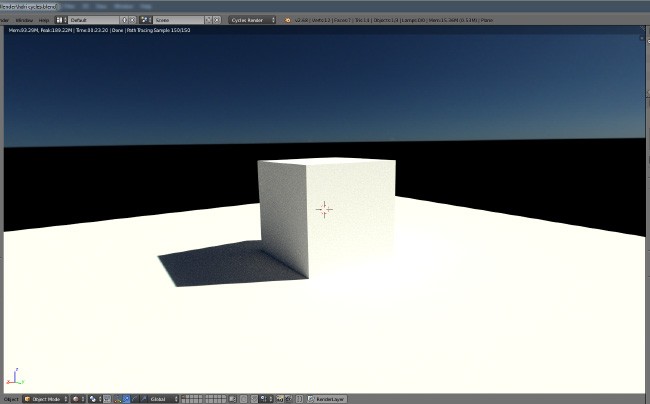
Here’s my default mid-day-ish frame:
Compared to Debevec’s at roughly the same time:
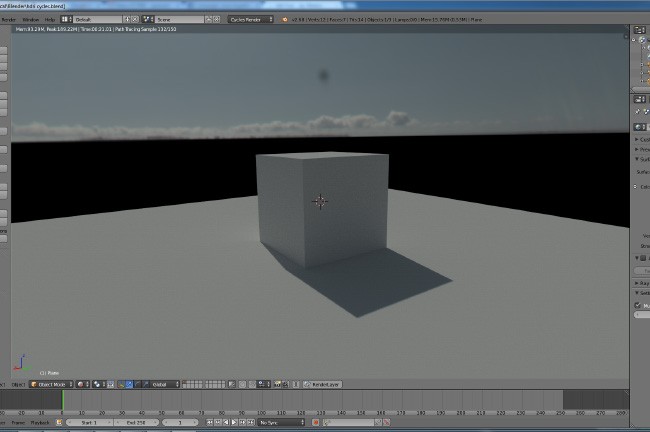
Debevec’s looks much lower contrast, perhaps a little too low for my tastes, but the good thing with low contrast is that it is much easier to post process however you like. Once you have deep blacks and blinding whites, its harder to pull them back.
Gamma and Linear issues
The main problem I’m having with this workflow is that right out of the gate, I’m importing and exporting images with Lightroom, which doesn’t allow a linear export. So this creates a knock on effect where all the subsequent calculations are working on non-optimal starting images.
If I use something like dcraw (exports linear) I then lose all the great benefits of Lightroom, which includes chromatic aberration reduction, fringing reduction, etc.
Workarounds
As the contrast seemed an unsolvable problem, I rendered out the sequence anyway and then ran them through Photoshop and adjusted the gamma so that the contrast was lowered. This seems like an ok solution, but I’d much rather have a perfectly accurate solution that doesn’t require ‘eyeballing it’.
I also experimented with using -40 to -100 contrast levels within Lightroom to try and linearize the Tiffs but as I said before, its hard to know exactly what the correct setting is to try and match a linear output.
New Linear Workflow with Nuke
Starting next week or so I’ll be getting my hands on Nuke and trying a fully linear workflow. I’ll post the results here and give my thoughts on the differences, pros and cons. Really looking forward to trying it and I’m hoping that it will be a much cleaner and more accurate solution, and being able to stick to one program for everything should help a lot too.
After playing with a couple trial versions of Nuke, my options seem to be either to use Lightroom as part of the workflow (which would then not be fully linear, but have better chromatic aberration/fringing removal) or use Nuke for everything with some select scripts and plugins like J Ops for Merging to HDR and importing NEFs. Alternatively I could match my Lightroom exports to the linear Nuke exports and take it from there.
Will keep you informed!
Thanks for following – if you’d like to be notified when the free samples are (finally!) released, you can sign up to the newsletter here. Apologies for how long the samples are taking, I know I’ve said a number of times how close they are, but I just can’t release something unless its up to standards.

I am not an expert in IBL lightning, but due the light reflected back to the cube from the ground plane, it seems to be an exposure/contrast issue inside the renderer itself. Even in the case of a point light, hard shadows and no skylight (a case of absolute contrast), the bounced light back to the cube is usually stronger than that, thats why I think there is no problem with the sky dome. Probably you have already checked that, just saying.
Saludos desde España, Keep on with your work!
Go Linear mate!
Both of the renders I provided were done with Blender Octane, with the same lighting setup, but different HDRI domes. I’ve also tested with Cycles and Maxwell, the results are all similar, so I don’t think its the renderer(s).
Thanks shouting out! Will let you know how Nuke goes in comparison.
Jay
Why even bother with Lightroom and Photomatix when PTGUI can handle RAW files and convert to HDR just fine? Remove CA during your photoshop stage. The problem may lie in the way Photomatix converts to HDR. I notice many differences in the resulting HDR files with varying software. Take as many variables out of the equation.
Thanks Justin, I realise PTGUI can handle RAWs, but I’m not sure how I’d remove CA with Photoshop afterwards? I had a quick Google around and apart from some hand painting, blurring/colour adjustment with masking to remove it, I’m not sure if there’s a solution that’s automated enough.
You also have to factor in changes in exposure levels (I change ISO during the shoot), which I was doing with LRTimelapse, but I can’t use that with PTGUI/Raw files. PTGUI also doesn’t do much in terms of noise reduction, sharpening, and white balance is a bit average (you just get a colour wheel).
And yeah I also see differences in HDR merges between various different software packages.
Is CA really that much of a deal breaker? Surely you would only see this in areas of high contrast. If so, you could always run a batch process in Photoshop using the Lens Correction tool or use a script that lets you do it in After Effects. http://aescripts.com/efx-chromatic-aberration/
For flickering issues, you could also load your HDR sequence into After Effects and run a Deflicker plug-in, of which there are several available. (I assume Nuke would have one too). Here is one http://www.granitebaysoftware.com/Products/ProductGBD.aspx
Basically what I’m suggesting is that you are not limited to Lightroom.
However, what you could also try is exporting from Lightroom as DNG, rather than TIFF. Maybe this format will keep the files in linear colour space.
scrap the DNG idea. doesn’t retain adjustments when loaded into ptgui.
Forgive my persistence but I was playing with Adobe DNG Profile Editor (http://www.adobe.com/support/downloads/detail.jsp?ftpID=5494) and set a linear tone curve (by selecting it in the drop down list under Tone Curve). Then exported the profile which is now available in Lightroom as a camera profile. This sets a much flatter contrast for the image which I think is what you are looking for. You can then export using that linear profile. Give it a shot.
did you manage to try the linear profile from previous post in Lightroom Jay? I can send you the file if you like.
CA and fringing is pretty huge, yeah. It appears a lot on this lens around cloud/sky borders. In lightroom I need to correct both. I’ll check out lens correction in Photoshop and After Effects as you suggest, thanks!
In terms of deflickering, there is technically none because I fix the aperture open with a hardware hack on the lens, so I only need to correct for ISO changes, which may be doable without LRTimelapse, not sure yet. Flickering that remains in IBL animations is due to the clouds concealing the sun on one frame and then not on another.
The linear tone curve I believe still operates in srgb space – the same is available in Lightroom, you can tell it to use a linear curve, but its not a linear colour space/gamma (I’m pretty sure).
What I’m referring to is a camera profile which is different from the linear point curve under “Tone Curve”. This profile effectively nullifies the gamma adjustment which Lightoom adds to the image. I will email you the profile and you can add it to Lightroom. I’d really like to know if it works for you.
although I may need a NEF file from your D800. If you can upload one for me I can use it to create a linear adjusted profile. I get what you are saying about the sRGB space but I’m not sure that’s accurate, as the raw file does not use that colour gamut until you export to TIF or JPG.
Check your email. I’ve sent you the linear DNG profile for the D800. (Managed to download and use a RAW file for the camera)
also check this video out:
https://www.youtube.com/watch?v=_fikTm8XIt4