 Hyperfocal Design
So far I’ve been shooting 2EV gaps with the Promote Control for my HDRI brackets, and as the default recommended setting, this has worked fine. However a few things have made me want to test 3EV steps:
- Mostly unsure what the difference is between 2 and 3EV steps. I’ve heard that you’ll get banding instead of nice gradients.
- Does the d800’s 14.4 EV sensor make bigger steps possible?
- Less brackets means:
- more total time lapse frames before I run out of space
- less wear on the shutter
- slightly slower moving clouds if I want to shoot faster
- less ghosting for fast moving clouds
I thought I may as well test everything from 1-4 ev steps while I was at it, and in case anyone else was curious what the exact visual effects were. I’ve then rendered out some 3d scenes in blender using different HDRIs to see if it has any effect on image based lighting. I am a self professed, mostly non-technical person, so if anything I talk about here is off, I’m keen to hear your thoughts in the comments!
To ensure that each comparison is identical*, I shot 15 brackets 1 EV apart, and then merged 4 times:
- 15 total brackets, 1 EV apart
- 8 total brackets, 2 EV apart
- 5 total brackets, 3 EV apart
- 4 total brackets, 4 EV apart
*I wasn’t sure whether to tack on the 1/8000th exposure or not for the 3/4 ev tests, to get the same total dynamic range, but for the tests below I did leave them off simply to check gradients/noise.
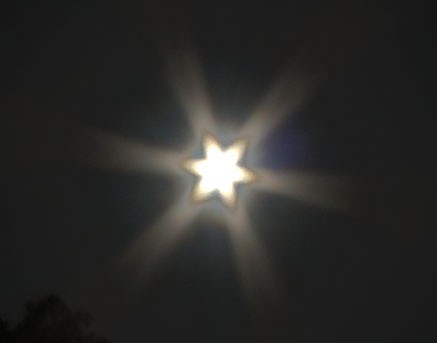
Since the sun is a great place to look at large brightness changes and gradients, I’ve cropped 100% around the sun to eye-ball the differences.
Setup
- D800+Sigma 8mm Fisheye
- ND3.0 Neutral Density Filter
- ISO 100
- F11
- Custom White Balance
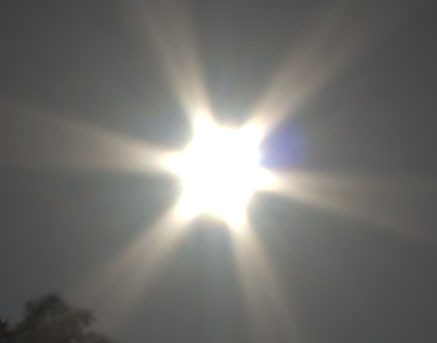
1 EV Step
Silky smooth:
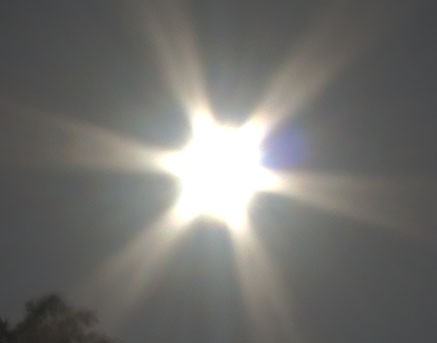
2 EV Step
Barely any noticeable difference, perhaps a slight increase in grain?
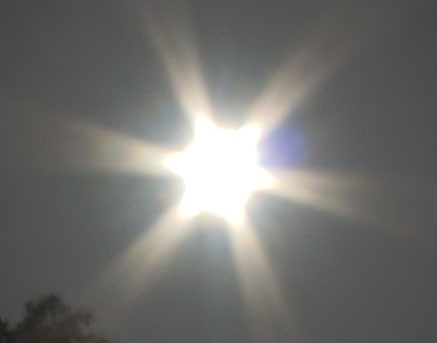
3 EV Step
This setting features minor grain and colour banding. This seems quite usable, though.
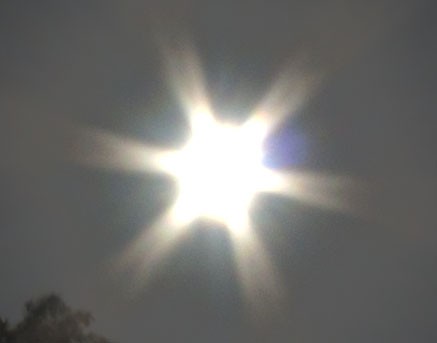
4 EV Steps
I thought this would be totally broken, but its surprisingly still not terrible. Slightly more grain again, and very obvious banding/stepping, with a noticeable dark halo between exposures visible.
5 EV Steps, for laughs
What happens when you really try and break things with a huge number of steps? Somehow there still aren’t any massive problems – sure its not smooth at all, but Photomatix somehow puts them together. I’ve gone for a lower exposure setting on this so you can see the exact steps more easily.
Conclusions
Once you stick a lens flare in your 3D scene, you may never see much in the way of stepping/grain around the sun. You’ll also rarely be zoomed in to 100% crop looking right at the sun. So I think a 3 EV step is probably going to be fine for most uses.
I’m tempted after this to use a 2.3 to 2.7 EV step on the Promote Control, but again the unfortunate thing with this is, when starting at 1/8000th and stepping all the way up at a fixed increment, you are forced to have your end exposure at either say, 1.3 seconds or 4 seconds, which means either blurry clouds or underexposed sky. Would love a way to force the end exposure on the Promote somehow, so I could set it to 2.7 EV steps, then tell it to ‘end’ at a 2 second exposure, meaning maybe there’s only a 1 EV step at the end. The interface for the Promote would make this difficult, though!
Image Based Lighting, 1 vs 4 steps
I should have probably done this test with a proper sky rather than a snippet of my back yard, but here’s some awkward looking tests with both 1EV steps vs 4EV, to see if image based lighting is affected:
1 EV step render
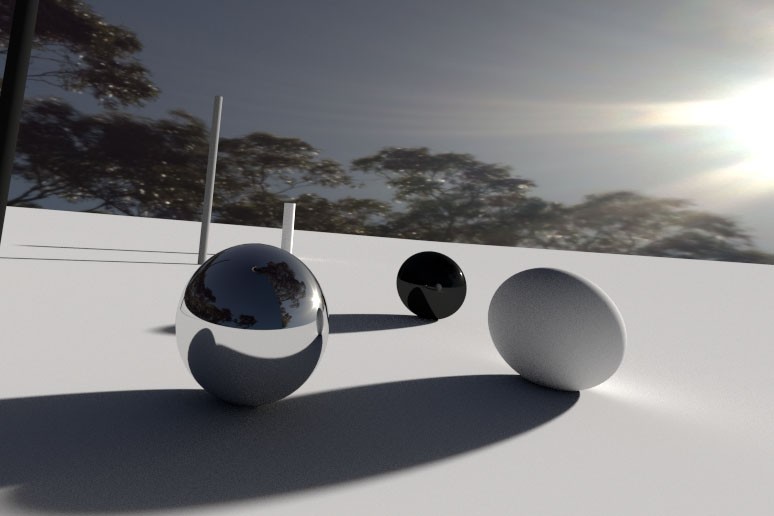
4 EV step render
This used a modified merge to HDR that uses both the brightest and darkest exposures, so there are 4EV gaps all the way up to 1/2000th, then a 2 EV gap to 1/8000th

Identical?
Surprisingly they look exactly the same – I was expecting some funky looking coloured shadows or something, but even the sky seems to lack any banding at the brightest exposure. Seems at least from this quick test, if you are shooting for IBL and won’t be seeing anything but the brightest exposure as a background, you can go for some huge EV steps with no noticeable drop in lighting quality. If you’re going to be looking at the sky through tinted glass, fog or smoke, however, it’ll look terrible. Some reflections will likely also look worse, anything that picks up the mid range of brightness in the HDR.
So that’s the test complete for the sky – something to consider might be that for environment HDRs, the result may be different. Big jumps in EV could cause banding in shadows or similar – I may test this in another post (and I should have shot longer exposures for this test, oops!)
Hope you enjoyed that and I hope its of some use to you if you’re shooting HDRI for image based lighting.
If you’d like to read more posts like this, gain access to future making-ofs, tutorials and samples, sign up to the newsletter here.
