 Hyperfocal Design
Creating a night sky from day
Hello and welcome to Hyperfocal Designs first tutorial. This tutorial will guide you through the alteration of a day time sky texture into a night sky texture complete with moon and starfield. At the same time we are also giving away a small, low quality version of a sky texture from the “Hyperfocal Skies 2” texture collection. It is written mainly in “broad brushstrokes” so you should have basic knowledge of Photoshop. This tutorial can also be used for adding more stars to existing night skies, or if you’ve sized a night sky image down and lost all the star detail.
You can use your own sky texture or photo, or one of Hyperfocal’s.
Start
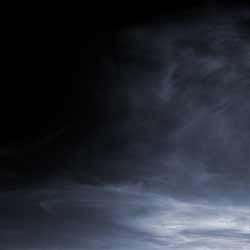
Load your source sky image, I’ll be using HFD_HemiBlueSky03.jpg. Before starting, if you have a recent version of Photoshop then change into 16 bit editing mode, if you have an older version then you’ll be able to change to 16 bit but you won’t be able to make any changes. You can try this tutorial in 8 bit mode but it won’t be quite as smooth. The large color and levels changes will create some banding.
Part One
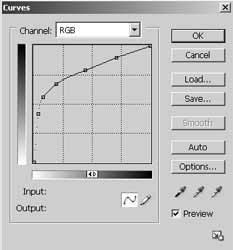
Step 1:
Now to start – use a curves adjustment layer to darken the sky and add contrast while keeping detail in the clouds. This is what my curve looked like for BlueSky03:
Step 2:
Add a levels adjustment layer. Using your input levels, bring up some of the clouds and darken the sky further by entering values of around 16, 1.00, 108.
Step 3:
Now the colors are looking pretty horrible and the sun doesn’t look too nice either so add a hue/saturation adjustment layer. Check colorize and give it a nice blue hue. Play around with the saturation until you reach a level you’re happy with and leave the lightness level alone.
Step 4:
Ok if we zoom out it looks like we’ve lost some detail in the clouds on the horizon. Go back to your curves and levels adjustment layers and select the layer mask. We’re going to use a gradient mask to tell Photoshop where to apply the adjustment layers. Change your foreground/background colours to white and light grey respectively and add a gradient going from mid way up the image to just above the horizon. This will bring up the clouds on the horizon and leave everything else as it was.
Step 5:
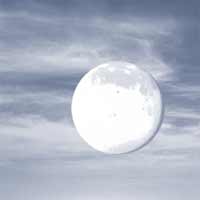
We’re looking ok now except for the sun, so lets get rid of that. I’ve simply cut a piece of sky from near the sun and pasted over it, rotated it and done a bit of cloning. You could do all cloning if you wanted, I’ve just made sure to leave the white looking clouds below as they are. Making this sun “cover” piece is best done on a seperate layer so you can change levels/layer size/rotation to match it perfectly.
Step 6:
Grab a moon photo from somewhere. Depending on the look you want, you could use anything from a simple, near white sphere to a perfectly exposed, detailed photo of the moon. There’s some freely available ones on Nasa that you can use if you don’t have any (just don’t forget to read their usage terms). Use a circular marquee and cut and paste your moon in underneath the adjustment layers. Depending on the type of photo you have, you might be able to place it in without any changes, or you might need to alter brightness/levels or use a combination of normal and screen layers. Since the moon at night tends to illuminate mainly the directly adjacent clouds, I’ve placed mine down amongst the brighter clouds on the horizon. This should look pretty good at this stage if you have your moon fairly bright, otherwise it might look stuck on top of the clouds.
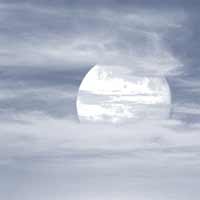
Step 6b:
If you want to go a step further and make the moon appear behind the clouds, first copy and paste the cloud selection directly behind the moon then paste it above your moon layer. Go to Select>Color Range and select all the dark sky in between the clouds. Delete this and you’ll be left with an accurate looking moon behind your clouds. Depending on how bright your moon and clouds are, you might want to brighten (highlights) the clouds immediately surrounding the moon.
Ok so I think we are looking pretty good at this stage, and for a city scene this might be all you need to do, as its quite hard to even see stars in a light polluted city sky. Infact if you have got a city/suburban scene you might want to alter your hue/sat values to more orange tones that are more common in clouds lit by street lights. Otherwise lets move on to creating a starfield for our sky.
Part Two
Step 1:
If you want to clean things up a bit you can flatten your previous sky or save it first as a PSD and then use a flattened version before continuing.
Be careful what zoom level you work to when moving through this section of the tutorial – going from 25-50% zoom to 100% can look VERY different when working with subtle noise levels like this. If you work with adjustment layers you should be able to tweak the end result to suit your scene. Even if you don’t, the base star field layers are very easy to make so you can always go back and remake/tweak them.
We will initially create the faint background star fields. Create two black layers above your sky layer and select the top layer. Go to filters>noise and use a fairly low value, around 15-20%. Make it gaussian/monochromatic. It will be difficult to see at this stage but you will be making levels and contrast adjustments to brighten them up.
Step 2:
Use either brightness/contrast or levels to brighten the lighter noise and remove the darker background noise. I prefer levels as it gives you that extra level of control over brightness/contrast. Tweak it to your liking, depending on how dense a starfield you want to achieve. Remember this will be your background starfield so you don’t want anything too bright here. If you’re creating a city sky you could almost skip these first steps and just go on to the brighter star creation in step 3.
Step 3:
Create another black layer, add noise as before but this time give them a small blur (1-2 pixels) before altering your levels/brightness/contrast. Tweak your levels to bring out brighter stars, but less of them. The blur has made these stars slightly larger, not just 1 pixel per star, which are easily lost when sizing down to smaller resolutions or when using wide angle lenses. You can create a star glow layer on top of this by copying the layer, blurring it, and adding it as a screen layer. You’ll need to adjust the levels on this layer as well to give the appropriate glow effect.
You can either leave the stars all one hue or go in and manually start changing individual stars. Good colors are Red, orange, yellow and shades of blue. Just use a color brush and randomly choose stars. Colored stars near the horizon look a bit wrong for some reason so I left them mainly monochromatic.
Step 4:
Stars aren’t this bright on the horizon, so on each star layer create a mask and use a gradient to remove the stars, or flatten/merge your star layers first and just make one mask. At this stage we have a half decent star field and this may be all you require. Depending on the look you want, set your starfield to lighten or screen. Screen makes the cloud layer look much more transparent, lighten mode is more realistic looking. If you want the clouds to look denser, create a mask for your star layer and paint out the stars on top of the clouds.
For more variation you may want to make a darken layer and go in with a large black brush, painting in darker areas, or use the clone brush to create star clusters. The more lengths you go to to make the star field random, the better it will look.
Step 5:
If you want something with a bit more interest you can go further by creating constellations, clusters, dark & light regions of space, or even the milky way. For alien skies you could add more planets/moons, nebulae and so on. I’ll stop here since this is a sky as seen from earth, not a deep space image or alien world, and this really suffices for most purposes.
If you’re going to be sizing your textures down a lot, you’ll want to keep your star layer permanently seperate from the rest of the sky. When you down size you lose a lot of the stars and you will need to be able to correct this with a levels adjustment independant of the clouds layer.
If you’d like to take the starfield further or you’d like to create deep space images/planets and so on, Greg Martin has some great tips in a similar tutorial at http://gallery.artofgregmartin.com/
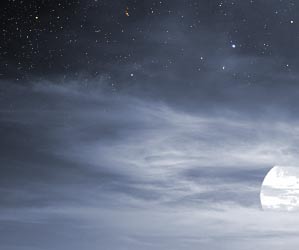
This sky image was created using a sky texture from “Hyperfocal Skies 2”, for more information, view the Skies 2 product page.